To create a load in Techvia TMS you choose the customer, dispatcher and carrier on the Details tab, enter your rate and what you’re paying the carrier, add a pickup and a delivery on the Stops tab, and click Save load. The load gets its own number automatically, and your margin is calculated as you type. The whole thing takes a couple of minutes once the setup from the earlier guides is in place.
This is part four of the series. You’ll need the dispatcher, the customer, facilities and carrier from the previous posts, because the load form asks you to pick them.
Start the load
Go to Operations → Loads and click Add load. The form has three tabs while you’re creating it: Details, Stops and Other charges.
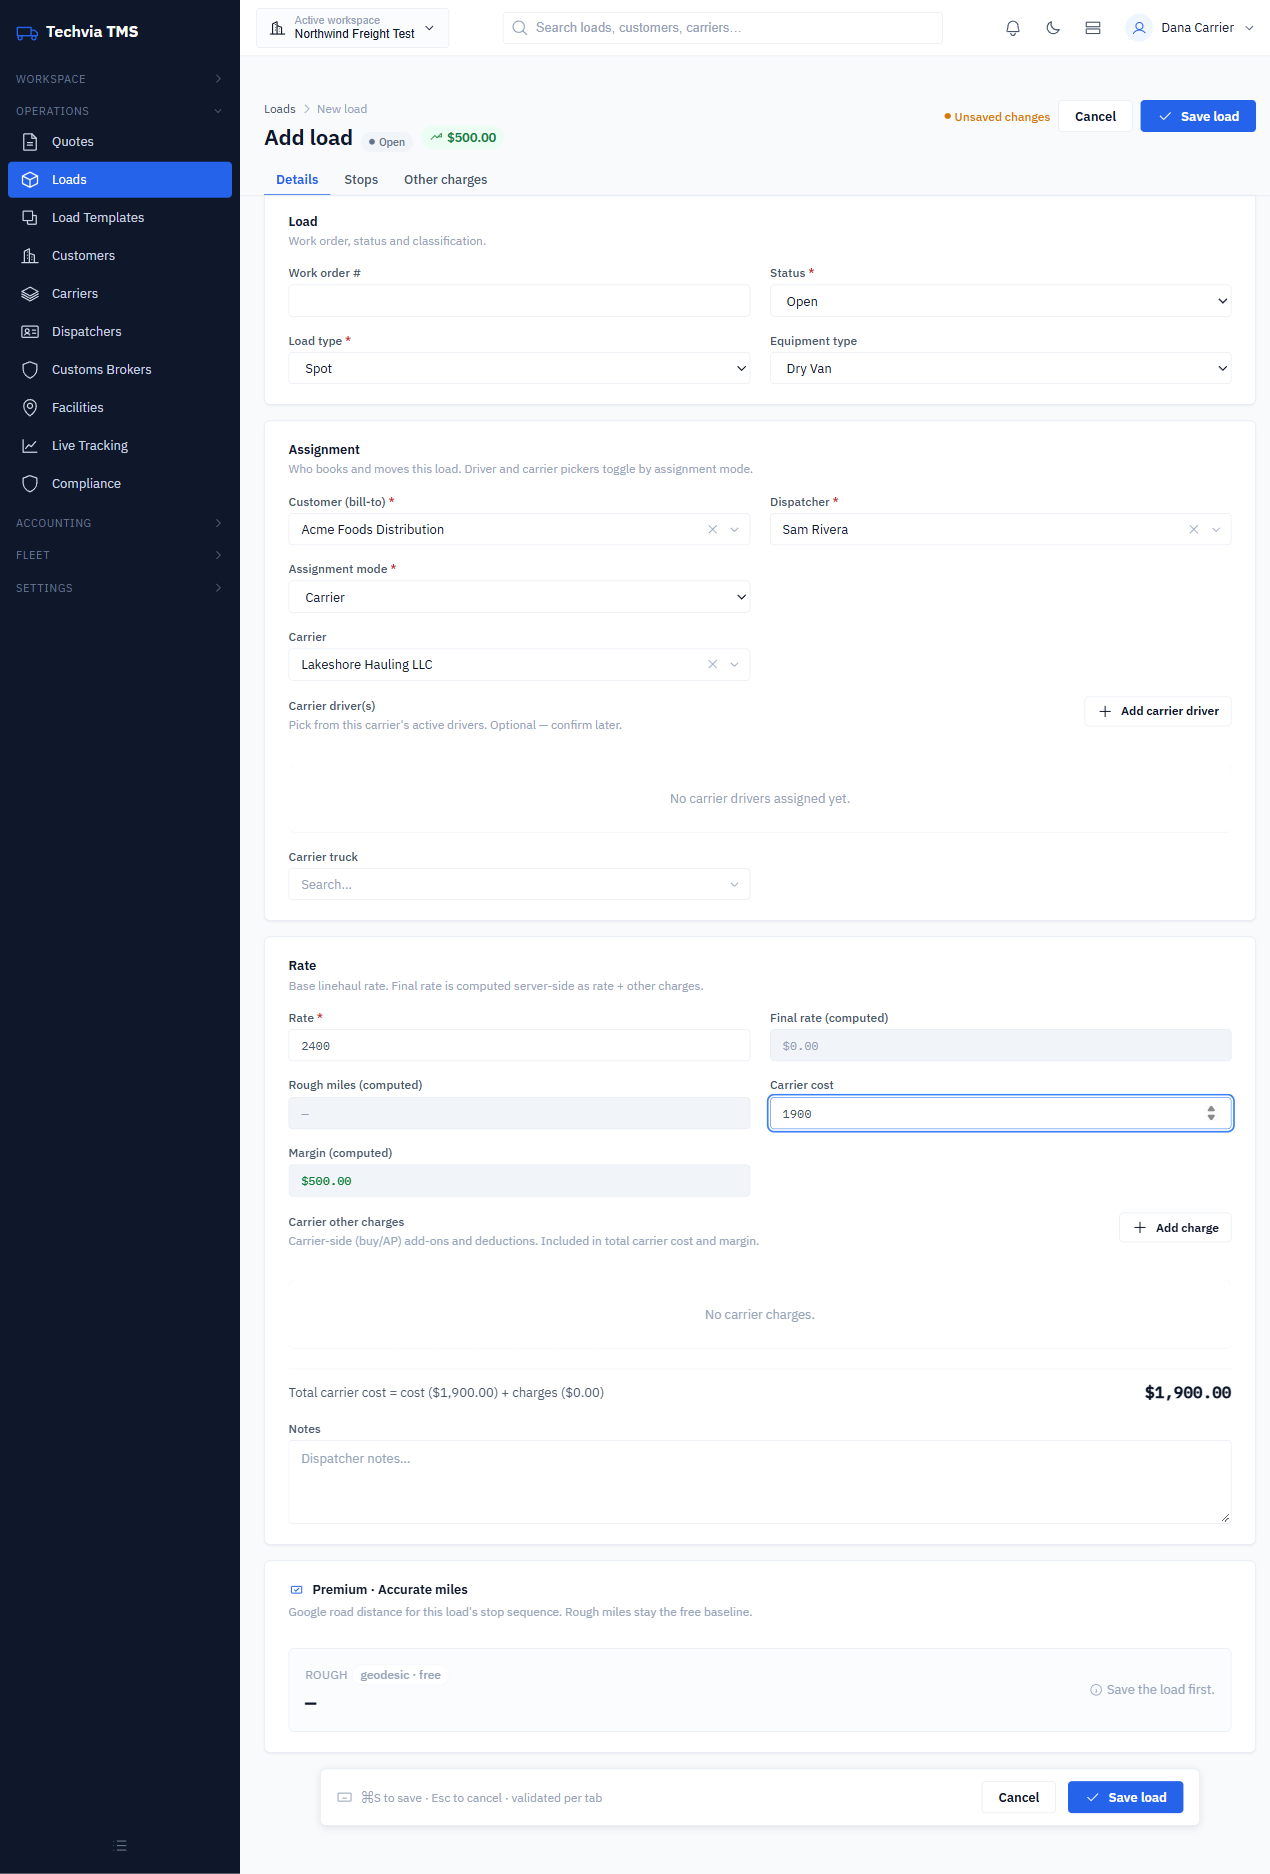
The Load section
- Work order # is optional. Use it for the customer’s own reference.
- Status starts at Open. The list runs Pre Book, Open, Covered, At Pickup, En Route, At Delivery, Delivered, Completed, Invoiced, Cancelled and TONU.
- Load type: Spot, Dedicated or Contract.
- Equipment type: Dry Van, Flatbed, Reefer, Tanker, Step Deck or Other.
The Assignment section
Three fields are required:
- Customer (bill-to): start typing and pick from your customers.
- Dispatcher: the person handling the load. If this list is empty, you skipped the dispatcher step.
- Assignment mode: None, Driver or Carrier.
Pick Carrier and a carrier field appears. Choose your carrier from the list. (Once the load is saved you’ll also see optional boxes for the carrier’s driver and truck.) You can also leave the mode on None and assign later, which is how you’d work a load you’re still trying to cover.
The Rate section
- Rate is the linehaul you’re charging the customer.
- Carrier cost is what you’re paying the carrier.
- Final rate is calculated for you as the rate plus any other charges.
- Margin is calculated too.
Enter a $2,400 rate and a $1,900 carrier cost and the page header immediately shows $500.00 as the net margin, so you know what a load is worth before you save it. If you’re not sure what to charge in the first place, see how to calculate freight rate per mile.
You’ll also see a Rough miles field that Techvia calculates, plus a premium Get accurate road miles option that pulls Google road distance once the load is saved. In our test, Rough miles stayed blank while the facilities had no saved coordinates, which is another reason to use address search on the facility form.
Add the stops
Switch to the Stops tab and click Add stop.
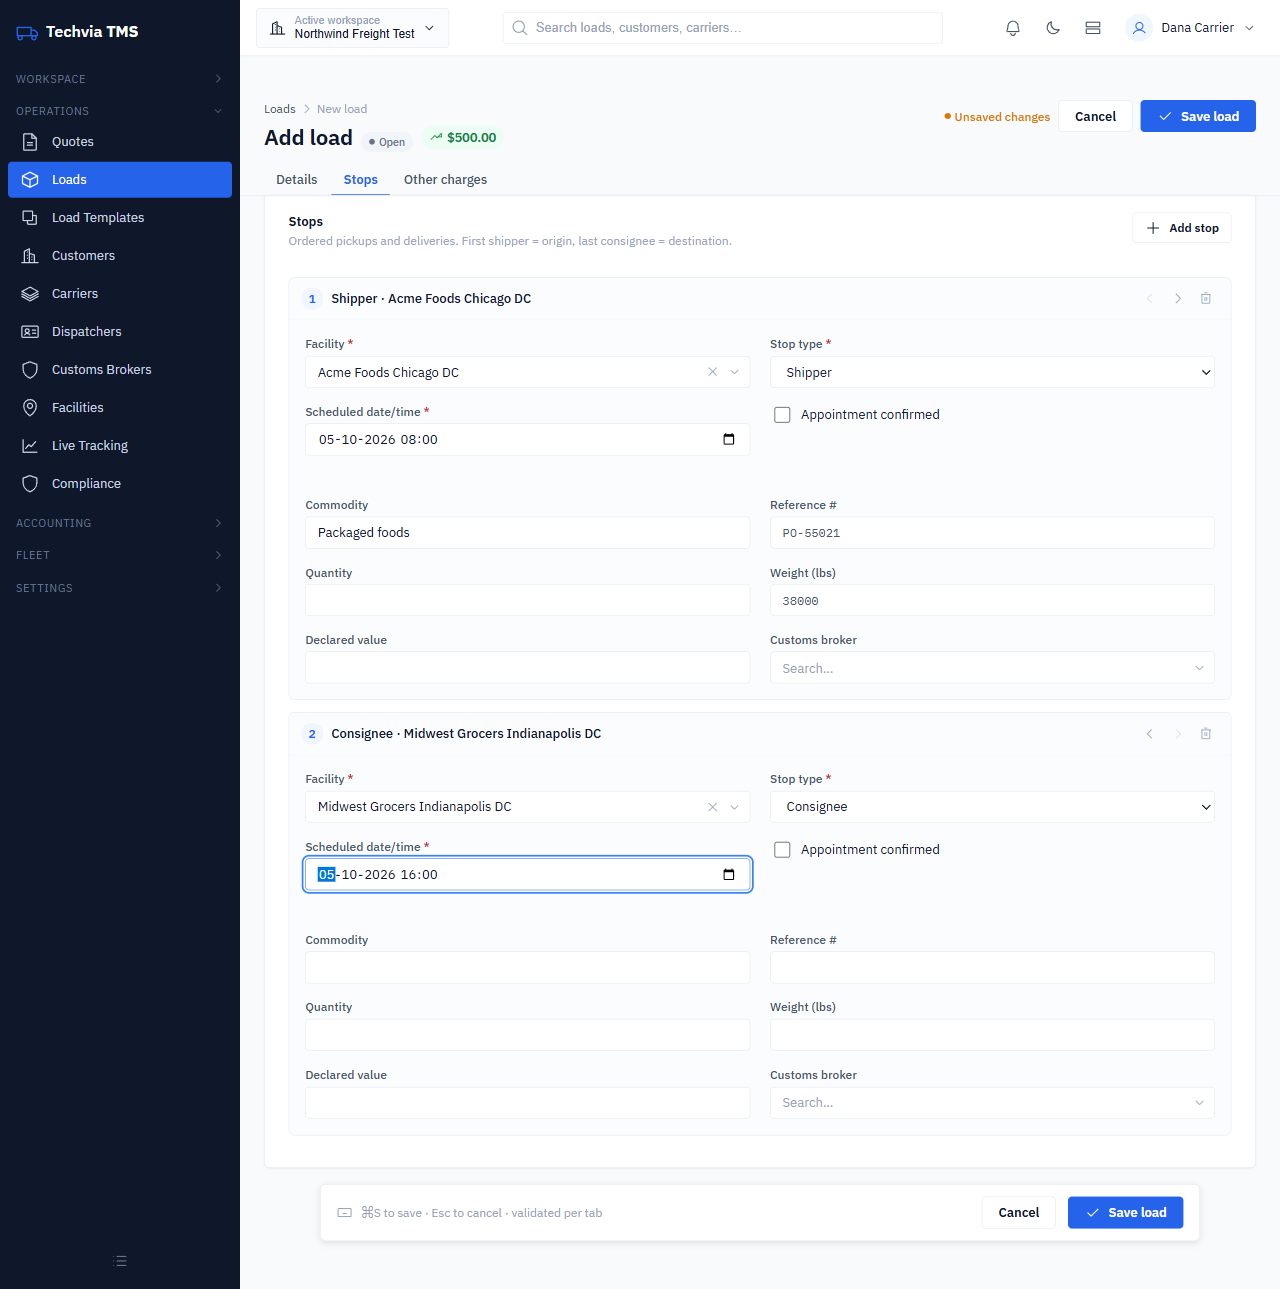
Each stop has:
- Facility: pick from the facilities you saved.
- Stop type: Shipper for a pickup, Consignee for a delivery.
- Scheduled date/time, marked required.
- Appointment confirmed, if the time is locked in.
- Commodity, reference number, quantity, weight and declared value.
- Customs broker, for cross-border freight.
The first stop defaults to Shipper and the second to Consignee. Techvia treats the first shipper as the origin and the last consignee as the destination, so the order matters, and the arrows on each stop let you move it up or down. For our example, pickup is at the Chicago distribution center on the morning of October 5 with 38,000 lb of packaged foods, and delivery is the Indianapolis DC that afternoon.
Save it
Click Save load. You’ll get a “Load added” message and the load opens with its own number, in our case L-2026-000001. Numbers follow your workspace’s load numbering scheme, which you can change under Settings → Load Numbering.
Once a load is saved, extra tabs appear: Documents, Activity timeline and Live tracking, plus Duplicate and Save as template buttons for repeat lanes.
See it on your load board
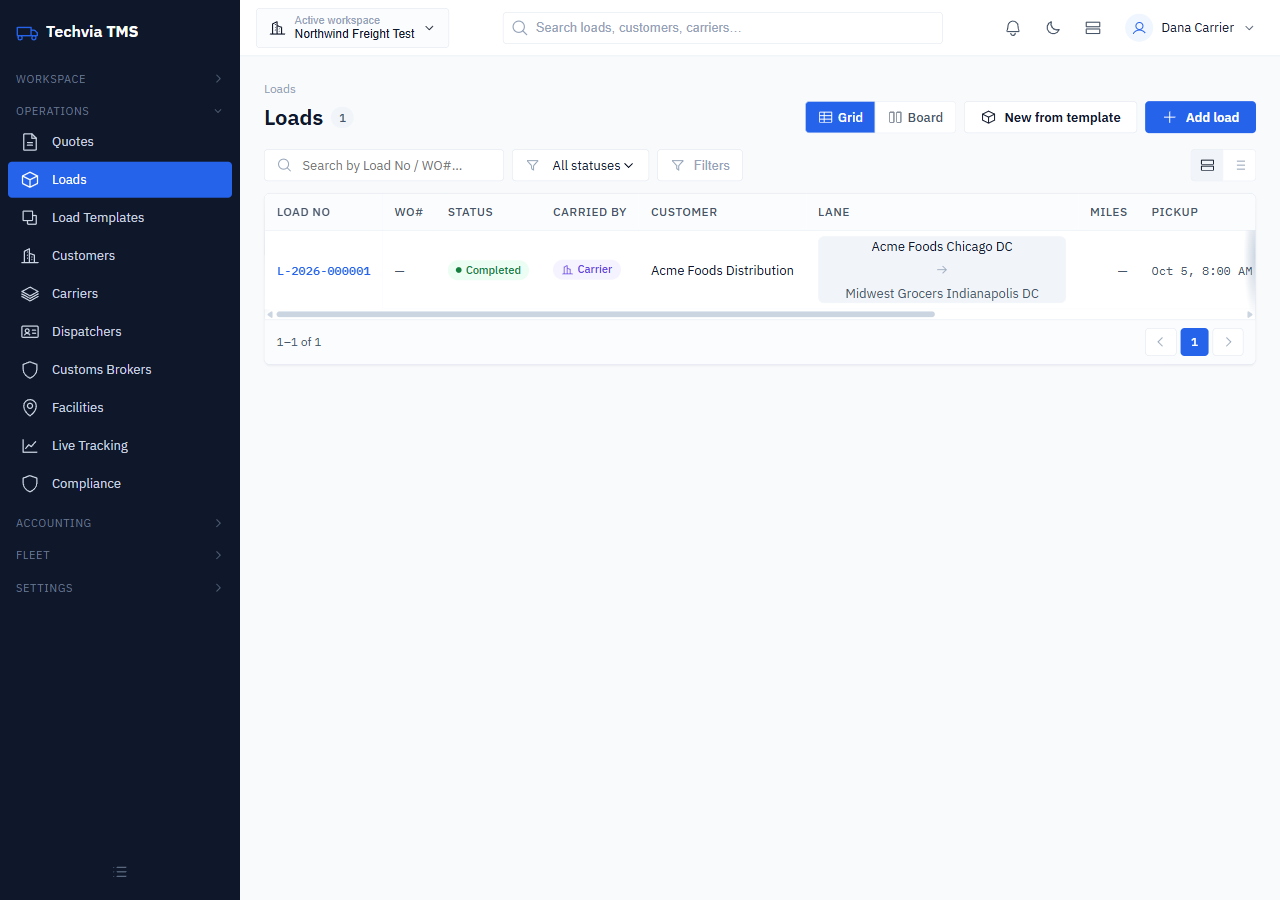
Back on the Loads list you can see every load with its status, carrier, customer, lane, pickup and margin. The Grid and Board buttons switch between a table and a column-based dispatch board.
Moving a load through its statuses
Open the load and change the Status dropdown, then save. Techvia shows a “Load updated” message when it’s done. Two things we noticed:
- Assigning a carrier didn’t change the status by itself, so set it to Covered when you’ve booked one.
- Nothing forces the order. We went from Covered straight to Delivered and then to Completed without the app objecting, so your team’s process, not the software, decides how strict to be.
Completed is the status that matters most for the next step. That’s what makes a load billable, and it’s what we cover in the final guide: invoicing a load and recording payment.
If you use rate confirmations, the ratecon workflow guide shows how they fit around this.
Try it yourself
Techvia TMS is $49 a month with unlimited users and trucks. There’s no credit card needed to start, so you can build your first load today.